Magic Carpet
I just returned from a 3 day Magic Carpet class held at Quilting in the Desert. Ginny Goodbar taught liberated quilting techniques to construct strata which were then combined to create a "magic carpet". The finished top is then layered with batting and backing. The top will be quilted with couched threads, beads and decorative stitching. My magic carpet top is now ready to quilt, but I have a few other projects to complete before I can start embellishing my top. The top is 30 inches by 42 inches.

Comments (3)
Quilting at the Lake
Back home after a great few days with quilting friends. We attended Quilting at the Lake in Lake Havasu City Arizona. I drove up on Friday with with a quilting buddy Perri. We then had a great lunch with Sandy and Joann who had just driven in from Henderson Nevada. After a wonderful lunch and visit to 2 great quilt stores we were back to the hotel to rest up for our quilting class on Saturday.
We had a little bit of rain on Saturday morning but that did not dampen the fun we had in class with Linda Hibbert, Silver Linings Originals, who designed an intricate paper pieced quilt for the class. Linda titled the quilt "Strolling at the Lake Havasu" which featured Gambel quail. It was a great class, learned some great paper piecing techniques.
This is Linda Hibbert's finished quilt

I was able to finish 2 of the chicks on Saturday. Can't wait to to finish the third chick plus the other Gambel quail.

After an intense day of class, our entire group when out for a wonderful dinner at Shugrue's
After dinner, we decided to take a group picture with the London Bridge as a background.

We had a little bit of rain on Saturday morning but that did not dampen the fun we had in class with Linda Hibbert, Silver Linings Originals, who designed an intricate paper pieced quilt for the class. Linda titled the quilt "Strolling at the Lake Havasu" which featured Gambel quail. It was a great class, learned some great paper piecing techniques.
This is Linda Hibbert's finished quilt
I was able to finish 2 of the chicks on Saturday. Can't wait to to finish the third chick plus the other Gambel quail.
After an intense day of class, our entire group when out for a wonderful dinner at Shugrue's
After dinner, we decided to take a group picture with the London Bridge as a background.
Comments (1)
Summer Blooms Bag
01/05/2015 07:22 PM
| Sue Spargo, Wool applique
| Permalink
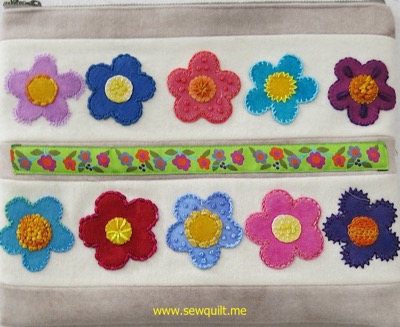
A few days ago, I finished embellishing the flowers on my Summer Blooms bag and today I sewed the bag together. It is always a challenge to sew wool because wool is thicker and the layers can easily shift when sewing a seam. I have found using the dual feed feature on my Bernina 780 a big help when sewing wool. Reducing the presser foot pressure also helps to minimize shifting.
Summer Blooms bag was designed by Sue Spargo and is 12" by 9".

Summer Blooms bag was designed by Sue Spargo and is 12" by 9".
In Full Bloom
12/29/2014 06:15 PM
| Sue Spargo, Wool applique
| Permalink
In Full Bloom was Sue Spargo's 2014 BOM. This was the tenth year that Sue has done a BOM and this was my second Sue Spargo BOM. All BOM participants agree not to post any pictures of In Full Bloom before the quilt is published. Since I am unable to post a picture of my completed top, I am posting Sue's line drawing. I am just thrilled to have completed In Full Bloom in 2014.

Tomorrow, I will be taking my completed top to Jessica Gamez so she can do the machine quilting.
I have signed up for the 2015 BOM and is titled Folk Tails and I can hardly wait to begin. I should receive my first 2015 BOM package the beginning of January so I guess I have a few weeks to stitch on some of my unfinished projects. This is the line drawing of Folk Tails
Comments (1)
The Girls
12/09/2014 07:34 AM
| Machine Embroidery, Poodles, Quilts
| Permalink
I spent a few days with my quilting buddy working on a embroidery machine appliqué project from the pattern Mixed Mutts. The quilt top is now complete and Jessica Gamez will be doing the machine quilting. I chose the poodle, schnauzer and the golden retriever in honor of the breeds of dogs I have owned. My web page Waiting at the Bridge has pictures of my dearly departed dogs, you can also click on web pages for Katie and Molly my standard poodles. I often refer to Katie and Molly as The Girls so I chose to title my quilt, The Girls. You can see Sandy's finished quilt at http://sandywf.blogspot.com

Comments (1)
Destination Creativity
11/23/2014 01:48 PM
| Machine Embroidery, Quilts
| Permalink
Friday and Saturday, Sandy, my quilting buddy from Henderson Nevada, attended Destination Creativity. The 2 day event, hosted by the Bernina Connection, included four 3 hour classes. All the class kits and supplies were provided as well as the Bernina machine. Friday morning I made a small bag using the Bernina 1150 MDA overlocker. The bag was constructed entirely with the overlocker.


Friday afternoon I learned curved piecing while piecing blocks for a table runner.
Saturday morning, I made a large project bag.

The last class was machine embroidery taught by Claudia Dinnell. Claudia was a fabulous teacher and I really learned some great new machine embroidery techniques. The class project was a double eyeglass case which is almost finished, I just have to sew on the binding.

Friday afternoon I learned curved piecing while piecing blocks for a table runner.
Saturday morning, I made a large project bag.
The last class was machine embroidery taught by Claudia Dinnell. Claudia was a fabulous teacher and I really learned some great new machine embroidery techniques. The class project was a double eyeglass case which is almost finished, I just have to sew on the binding.
Snap Hoop Monster
11/16/2014 07:49 PM
| Machine Embroidery
| Permalink
Today, I decided to do some machine embroidery, not my most favorite thing to do. I usually do my embroidery design using Floriani Total Control software. The software is great but it is PC based, since I have been a Mac user since 1986 using PC software can be a chore. I can use Floriani Total Control because I have Parallels 9 installed which allows my Mac to act like a PC. So I deal with the stress of “using” a PC and get my design exported to my Bernina thumb drive. Now, it is time to go to my sewing room. My new Horn electric lift got my Bernina 780 to the proper height effortlessly and I now store my embroidery module in the new Koala cabinet, so now it is easy to get my embroidery module. Just to make things interesting, I decided to try 2 new products. When I was at the Houston Quilt Festival, I stopped at the Wonderful booth and I learned a new use for Wonder Guards. I was told you can use Wonder Guards on the embroidery thread spool, so I tried them and they worked great. The second new thing I tried was the Snap Hoop Monster. The Snap Hoop made hooping my fabric quite easy, sure did not have to deal with tightening the screw on the Bernina hoop. So my embroidery is now finished, just have to put all the embroidered units together to make a wall hanging.

Comments (2)
Bernina Studio Rollabout
11/08/2014 05:44 PM
| Bernina, Machine Embroidery
| Permalink
Today, my new Koala Bernina Studio Rollabout was delivered and I am so excited to have a drawer especially designed for the larger Bernina embroidery module. My local Bernina dealer, Bernina Connection, was able to order the rollabout for me. The Bernina Studio Rollabout is 32” wide, 25” deep and 29” high. I decided to get the white finish which would go with my new white Horn Super Quilter’s Dream electric lift cabinet. My Bernina 780 machine is quite a bit larger and heavier than my Bernina 630 and I decided upgrading my older Horn Quilter’s Dream cabinet was really necessary. The top drawer of the rollabout has special latches that allow the front of the drawer to lie flat so the embroidery module can easily slip in and out of the drawer.
Pictures of the rollabout and with the special top drawer open


My Bernina embroidery module inside the top drawer and a close up the drawer latches.


Pictures of the rollabout and with the special top drawer open
My Bernina embroidery module inside the top drawer and a close up the drawer latches.
Comments (4)
Houston International Quilt Festival
I flew to Houston last Wednesday and spent 5 wonderful days at the Houston International Quilt Festival with Sandy, my quilt buddy from Henderson Nevada. This year was the 40th year anniversary of the festival which was celebrated with a special red and white quilt exhibit "Ruby Jubilee!"

I took a class with Nancy Eha, Bead-Dazzling Embroidery Interpretations. Nancy is an excellent teacher and I learned many beading techniques.
We used printed stitch templates which are carefully removed after stitching. I did not remove paper on my stitching sample.

Of course, Sandy and I spent many enjoyable hours walking the 20 long aisle of vendors, 1000 vendors in one place is quilter's paradise. There were so many unique products, many not available at local quilt shops. I was especially happy to find some beautiful variegated size 5 pearl cotton threads made in South Africa imported by akonye ken and some beautiful linen fabric and hand made buttons from l'Atelier d'Isabelle These are just some of the things I purchased.

I took a class with Nancy Eha, Bead-Dazzling Embroidery Interpretations. Nancy is an excellent teacher and I learned many beading techniques.
We used printed stitch templates which are carefully removed after stitching. I did not remove paper on my stitching sample.
Of course, Sandy and I spent many enjoyable hours walking the 20 long aisle of vendors, 1000 vendors in one place is quilter's paradise. There were so many unique products, many not available at local quilt shops. I was especially happy to find some beautiful variegated size 5 pearl cotton threads made in South Africa imported by akonye ken and some beautiful linen fabric and hand made buttons from l'Atelier d'Isabelle These are just some of the things I purchased.
Once a Wildcat, Always a Wildcat
My new mailbox flag just got installed today. Wasn't easy, as the flag was designed to be installed on a metal mailbox and I needed to install my flag on stucco. My flag was designed by Mark Alan Designs.
I don't think there is any doubt that I support the University of Arizona Wildcats.

I don't think there is any doubt that I support the University of Arizona Wildcats.
Comments (2)