Black and White and Read All Over
I have a personal rule, I don't buy fabric without a plan to use the fabric in the immediate future. In other words, I don't want to buy fabric to add to my stash. In October, I went Modern Quilting just to check out the newest quilt store in Phoenix. I saw a newspaper fabric that I just loved but I really did not have any plan for using this fabric. I walked around the store but I kept going back to the newspaper fabric so I looked at books for a quilt idea. I found the book, Jelly Roll Jambalaya Quilts by Jean Ann Wright and I liked one quilt called Andouille. So with a quilt in mind, I purchased a jelly roll (a first for me) and enough newsprint fabric to use for the quilt back.

The fabric is modern background paper by zen chic for Moda. As I am sewing the quilt, I am remembering the old riddle - What is black and white and read all over? The answer is a newspaper because of the identical pronunciation of read and red. Wow, I now have a name for my new quilt, Black and White and Read All Over and an idea for the machine quilting. Jessica Jones Gamez did the beautiful machine quilting with red thread.
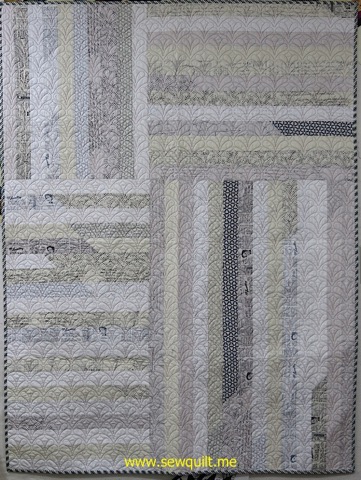
I used a striped fabric for the binding which I cut on the bias. The quilt is 62" by 47".
The fabric is modern background paper by zen chic for Moda. As I am sewing the quilt, I am remembering the old riddle - What is black and white and read all over? The answer is a newspaper because of the identical pronunciation of read and red. Wow, I now have a name for my new quilt, Black and White and Read All Over and an idea for the machine quilting. Jessica Jones Gamez did the beautiful machine quilting with red thread.
I used a striped fabric for the binding which I cut on the bias. The quilt is 62" by 47".
Comments (3)
Sunflower Cowboy boot
01/10/2016 09:43 AM
| Bernina, Machine Embroidery
| Permalink
Yesterday, I finished another boot at Claudia Dinnell's "Boot"iful Bouquets class. I had so much fun and my Bernina 790 performed like a champ. My second boot was again a cowboy boot but I made a blue boot with grey trim, choosing brighter hues than I used on the first cowboy boot. The second boot has a sunflower bouquet instead of the Christmas toys.
I love the Maxi hoop which I can use on my Bernina 790 because of the large embroidery area. The entire boot was embroidered in one hooping and the sunflower bouquet only required one hooping too. The embroidery time for just the sunflower bouquet was 180 minutes. The background fabric is stabilized with Shape Flex SF101 by Pellon. Then a polymesh cutaway stabilizer was sprayed with Webbond by Mettler to adhere it to the back of the background fabric. After the background fabric was hooped, a piece of tear-away stabilizer was floated. Hooping is easier with the polymesh stabilizer since it is softer and more flexible than medium weight tear-away stabilizer. This stabilizing procedure was a new technique for me.

This week, I need to add borders to the finished embroidered centers. One of the best parts of these 2 quilts, all the fabric and threads were in my stash.
I love the Maxi hoop which I can use on my Bernina 790 because of the large embroidery area. The entire boot was embroidered in one hooping and the sunflower bouquet only required one hooping too. The embroidery time for just the sunflower bouquet was 180 minutes. The background fabric is stabilized with Shape Flex SF101 by Pellon. Then a polymesh cutaway stabilizer was sprayed with Webbond by Mettler to adhere it to the back of the background fabric. After the background fabric was hooped, a piece of tear-away stabilizer was floated. Hooping is easier with the polymesh stabilizer since it is softer and more flexible than medium weight tear-away stabilizer. This stabilizing procedure was a new technique for me.
This week, I need to add borders to the finished embroidered centers. One of the best parts of these 2 quilts, all the fabric and threads were in my stash.
Christmas Cowboy Boot
01/08/2016 09:18 PM
| Bernina, Machine Embroidery
| Permalink
What a fun day! I took a machine embroidery class with Claudia Dinnell of Claudia's Creations. Actually, it is a 2 day class so I get to have fun tomorrow too. Claudia designed a new rework style design for machine embroidery call "Boot'iful Bouquets. There are 3 boot types and 3 different bouquets to choose from, "Boot"iful Bouquets is the ultimate pick and chose machine embroidery design. The boot types were a cowboy boot, an ice skate or a Victorian boot and the bouquets choices were toys, sunflower or instruments.

I choose the cowboy boot and filled it with a christmas toy bouquet. Currently, the block is about 15" by 20”.
I choose the cowboy boot and filled it with a christmas toy bouquet. Currently, the block is about 15" by 20”.
Comments (2)
Bernina Stitch Designer
My Bernina 790 has a very cool feature called Stitch Designer. Today, I took a class at Bernina Connection where I was able to explore a few of the Stitch Designer features. The Stitch Designer allowed me to create stitches by drawing right on the machine touch screen.

Today, I learned how to alter existing stitches by adding additional elements or move stitch points to create a new stitch. I was able to write my name on the touch screen and stitch it out. The circles were also drawn on the touch screen and by removing the 9 mm restraint, I was able to stitch the circles using the Sideways Motions foot. The larger circles design is almost 2 inches wide. I was able to alter stitch #1329, a blanket stitch, to have a slanted appearance which really could be a nice edge stitch on a ribbon edge.
Today, I learned how to alter existing stitches by adding additional elements or move stitch points to create a new stitch. I was able to write my name on the touch screen and stitch it out. The circles were also drawn on the touch screen and by removing the 9 mm restraint, I was able to stitch the circles using the Sideways Motions foot. The larger circles design is almost 2 inches wide. I was able to alter stitch #1329, a blanket stitch, to have a slanted appearance which really could be a nice edge stitch on a ribbon edge.
Comments (1)
Christmas gift exchange
12/23/2015 06:39 PM
| Machine Embroidery, Wool applique
| Permalink
I belong to Sew Sisters, a weekly stitching group. Although, I am unable to attend a lot of the meetings, I always enjoy the creative input and lively conversations when my schedule allows me to attend. This year, I decided to participate in the holiday gift exchange. I made a wool appliqué pin cushion which is about 4 1/2" square and filled with crush walnut shells.

I am on a Bernina Yahoo group and a few months ago, the leader of the group posted information about a machine embroidery web site called Urban Threads. Urban Threads had some very unique and modern machine embroidery designs and I purchase 2 of their designs. One of the designs I purchased was Have a Holly Jolly Christmas which I used to make a gift bag for the cactus pincushion. The bag is 7 1/2" by 10".

I hope everyone has a wonderful holiday season and a happy, healthy and prosperous new year.
I am on a Bernina Yahoo group and a few months ago, the leader of the group posted information about a machine embroidery web site called Urban Threads. Urban Threads had some very unique and modern machine embroidery designs and I purchase 2 of their designs. One of the designs I purchased was Have a Holly Jolly Christmas which I used to make a gift bag for the cactus pincushion. The bag is 7 1/2" by 10".
I hope everyone has a wonderful holiday season and a happy, healthy and prosperous new year.
Comments (1)
Christmas stockings
I needed to make a few new stockings this year and all the Christmas stocking are now hanging. I actually finished the stocking over a week ago, but life got a bit hectic and I was unable to do a blog post. I made a set of stockings for my daughter's new condo plus I also needed to make a new stocking for Emmie, my daughter's new miniature poodle for my house.

My stocking are made using Vogue pattern 1312 which came out in the early 1970's. In 2010, I used a Bernina 180 to embroidery the names on the stocking cuffs using a font installed on the machine. Luckily, Bernina kept the same font on my current machine, a Bernina 790. It is always a challenge to make sure the once the cuff in sewed on and turned down that the name is in the correct position and I must admit that I did sew one of the cuffs on incorrectly. Well that is why they make seam rippers.
I made the stocking for Marcie with Hoffman Christmas batiks which were retired in 2009 but I was able to find the batiks at my favorite on-line batik source, Batiks Plus.
Comments (1)
Peanuts Christmas Quilt
Charles Schultz's Peanuts characters, Charlie Brown, Snoopy, Lucie and Marcie, have always been a favorite of mine. I have a lot of Peanut character Christmas ornaments which always bring a smile to my face. When I saw the Peanuts Christmas fabrics in 2012, I just had to buy enough fabric to make a quilt. It took me a few years to decide on a quilt pattern. My ideas always were rather complex and so I kept putting off making the quilt. This year, I decided to just keep it simple and decided to just make shadow box frames for each block. Jessica Jones Gamez did the machine quilting, she chose a perfect overall christmas light pattern. The quilt is about 47' by 47".

Comments (1)
Pincushion for Sue Spargo
11/15/2015 12:50 PM
| Sue Spargo, Wool applique
| Permalink
Saturday, I received a newsletter from Sue Spargo with some sad news.
Dear Friends,
On behalf of Sue, we feel it's important to share some very difficult news with you. In the recent weeks Sue has been diagnosed with breast cancer; she is in good spirits as she prepares to begin her treatment next week. Sue plans to continue her work in her studio here in northeast Ohio. We ask that you join us in surrounding Sue with much love and encouragement as she prepares to embark on this difficult journey.
Much love from Sue, Kelly, Andrew, Jason and Aimee
I have taken 3 week-long seminars with Sue plus I have participated in the 2013, 2014 and 2015 Block of the Month programs. Sue Spargo has inspired me with her creative wool appliqué embellishment. I decided to make a wool appliqué pincushion to support and encourage Sue in her fight with cancer. I will be mailing the pincushion to Sue tomorrow. The pincushion is approximately 5 1/2" square.
Another fun time in Houston
Sunday evening, I arrived home from Houston and today I unpacked and had a chance to reflect back on my time in Houston. I flew to Houston on Wednesday, arriving in time to attend preview night. Sandy and I were sharing a room and we met up with 5 friends from Phoenix. Preview night, 5pm to 7pm is reserved for class enrollees, Sandy and I of course hit the vendor aisles first. Oh my goodness, the first few aisles were slow going because of the wonderful hand dyed wool and thread I saw. This year there were certainly many more vendors with hand dyed wools and threads to tempt me. At 9:30pm, we had only seen about 75% of the vendors but Sandy and I were exhausted and decided to head back to the hotel. Thursday was another shopping day, it is not easy to be a quilter but somehow we preserved. Friday, we spent the entire day looking at the gorgeous quilts.
I saw Spirit of Sedona which was quilted by a group of very talented Phoenix quilters


2015 Houston quilt winners can be see at http://www.quilts.org/winners.html
Saturday, after braving a short walk in pouring rain, we finished looking at all the quilts and did a little shopping. After 3 1/2 days of quilt festival, Sunday is a short day, making sure we had not missed seeing any of the quilts or vendors.
Just a few pictures of some of the wonderful things I purchased at the 2015 Houston Quilt Festival. Honestly, there were very few frivolous purchases, I really did need everything I bought.


I saw Spirit of Sedona which was quilted by a group of very talented Phoenix quilters
2015 Houston quilt winners can be see at http://www.quilts.org/winners.html
Saturday, after braving a short walk in pouring rain, we finished looking at all the quilts and did a little shopping. After 3 1/2 days of quilt festival, Sunday is a short day, making sure we had not missed seeing any of the quilts or vendors.
Just a few pictures of some of the wonderful things I purchased at the 2015 Houston Quilt Festival. Honestly, there were very few frivolous purchases, I really did need everything I bought.
Enchanted Pumpkin
10/16/2015 10:37 AM
| Bernina, Machine Embroidery, Quilts
| Permalink
I took a class with Claudia Dinnell in August and I saw the Enchanted Pumpkin pattern. I decided that stitching the Enchanted Pumpkin would be a good way to practice the multiple hooping skills I learned in the Tis the Season class. The pumpkin requires 12 separate hoopings and I chose to stitch the entire pumpkin on a solid background. Before starting the machine embroidery., I fused Pellon SF-201 interfacing to the background and then I fused Pellon fleece This is the first time I used Pellon fleece, the biggest advantage was I did not have to use any tear away stabilizer. Another first for me, I used Havel's 5 3/4" double curved appliqué scissors. Sandy, my quilting buddy, had an extra pair of the Havel scissors and graciously gave me the scissors. Previously, I have used Gingher duck billed appliqué scissors but I found the blunt rounded tips of the Havel scissors were much easier to use. I used my Bernina Maxi hoop with the Master-Hooper which stabilizes the outer hoop allowing easier alignment of the inner hoop/hoop grid. The quilt is 18" by 22".


Comments (2)